
Task 1: Introduction:
In this room we will cover how to use tools built into our web browser, tools built into the system such as ping, traceroute, and telnet, and finally we will talk a little about netcat.
Task 2: Web Browser
The web browser can be a convienient and useful tool since it is reasily available on all systems. At the transport level, your browser will use ports 80 and 443 by default. How ever it is entirely possible to specify custom ports by typing in the ipaddress:portnumber. You can also open the developer tools to inspect things that your browser is sending to and receiving from the server. It’s even possible to view and modify the JavaScript files, inspect cookies, and look at the folder structure. There are also quite a few important add-ons that you can get. Here are a few common ones:
- Foxyproxy: lets you quickly change proxy servers. So you could have it set for direct, Burpsuite proxy, and Zap Proxy; allowing you to quickly switch between the options.
- User-Agent Switcher and Manager: Makes it look like you are accessing the system from a different OS or browser.
- Wappalyzer: Shows you the technologies in use on the site.
Out of these I have used both Foxyproxy and Wappalyzer, but I’m going to be checking out the User-Agent Switcher and Manager.
Task 3: Ping
Ping is found in every Operating system, whether Linux, Windows, or Mac. At it’s core, it is a tool that can be used to check network connectivity. The command will send an ICMP echo packet to a remote system and wait for the ICMP echo reply. Once it receives a response, you know the other system is online. It does operate a little differently between linux and windows. In Linux, it will do a continuous ping until you stop it, whereas Windows will send 4 packets and stop. To get Windows to do a continuous ping, you need to specify the -t option. With Linux you can use the -c option to stop at 10 packets, or you can specify a number after the -c option if you want to send a specific number of packets. In Windows you would use -n for the same option.
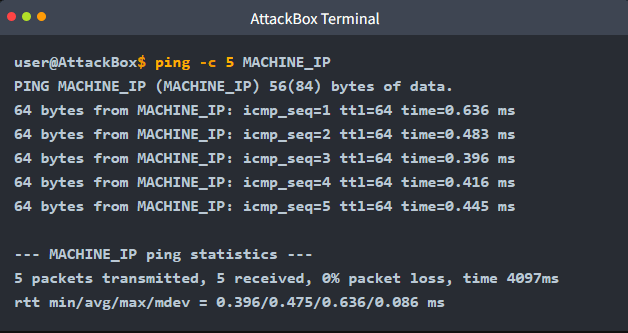
In this screenshot, you can tell that the destination host is reachable, it’s average response time, TTL, along with other information.
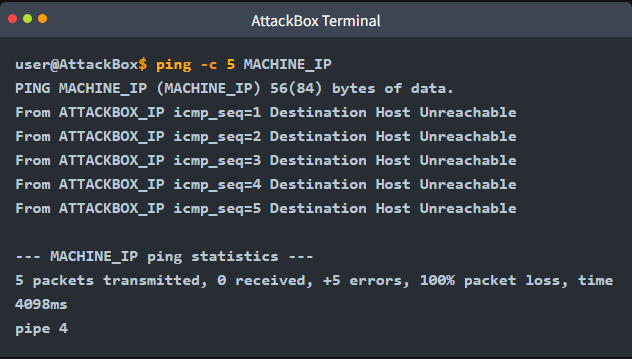
In this screenshot, the host is unreachable. This could be caused by a number of things. There could be a firewall dropping ICMP Echo packets, the device is unresponsive (i.e. turned off, still booting, or crashed), It could be disconnected from the network, or there is a faulty device somewhere between you and the device.
Task 4: Traceroute
Traceroute/Tracert are used to see the route your traffic is taking from you to the desired device. Linux/Mac use the command traceroute, while Windows uses tracert. Since there is no way to actually know the exact path our traffic takes, we use the ICMP Echo packets to do the work for us. This is accomplished by setting a low TTL and then progressively increase the TTL until we reach our destination. II
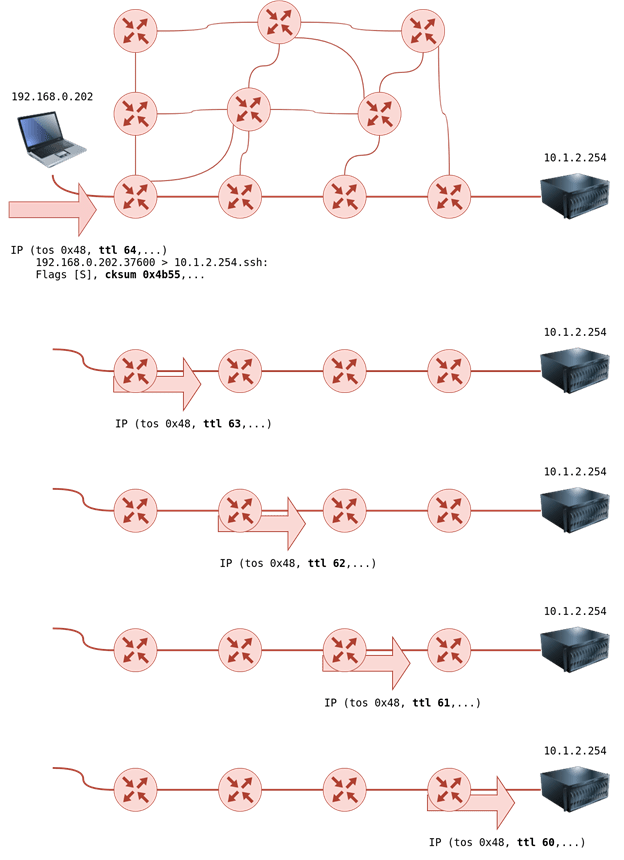
In Linux traceroute will start with a TTL of 1, which means the next device will cause it to reach a 0 at the next router and give you a response of TTL exceeded. This gives you the IP address of the first router. Then it will send a packet with a TTL of 2 and keep repeating this process until it either reaches your destination or exceeds the maximum number of hops.
Task 5: Telnet
Teletype Network, better known as telnet, was developed in 1969 to communicate with remote systems via the CLI. The default port for Telnet is port 23. In today’s world, it is recommended not to use telnet due to it not being encrypted. Anyone who has the ability to monitor network traffic will be able to see all data being transmitted across a telnet connection. However, it is still a useful tool. You can use it to connct to a serivce and grab its banner. If the service is encryted, you can even exchange some messages with it.
For example, if you know there is a service listening on port 80, you can use Get / HTTP/1.1 to get the default index page. You could even specify a specific page by doing Get /page.html HTTP/1.1. You will then need to input a value for the host and hit enter twice.
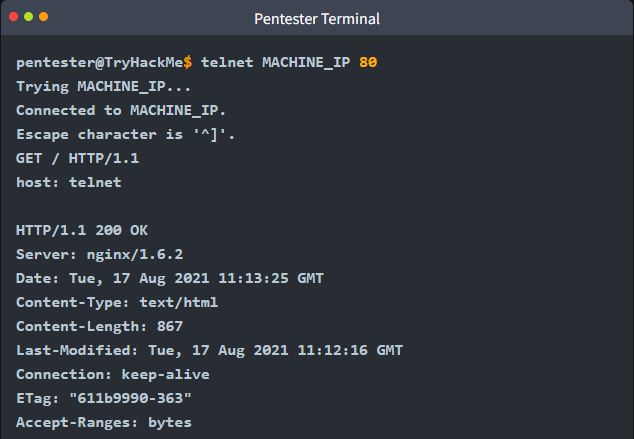
Using this relatively tool, we have just discovered that the server is using nginx 1.6.2. This could be useful information for later on in a penetration test.
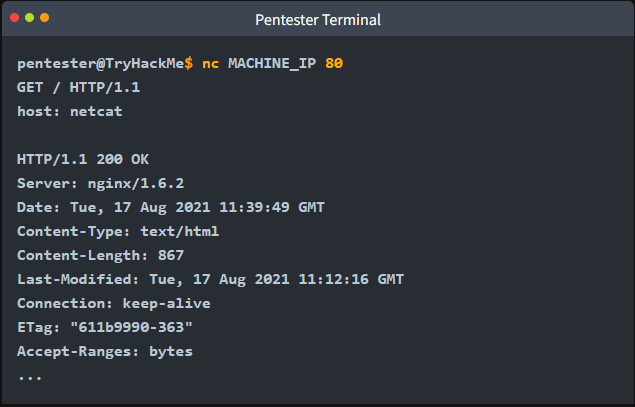
Task 6: Netcat
Netcat is a useful CLI tool that can be used for creating a connection over TCP or UDP. It can be used to create a server listening for an incoming connection or you can use it to connect to a remote device on a listening port.
Similar to Telnet, you can grab the banner of the service running on a specified port.
You can also use netcat to setup a listener on our system, in this case it is running as a server. When setting up a netcat listener, you have several options to choose from:
- -l: Listen mode
- -p: Port Number
- -n: Numeric only; doesn’t resolve DNS
- -v: Verbose (-vv for very verbose)
- -k: Keep Listening after client disconnects
One feature is that you can combine options such as -lvnp or -lnp. However, it is important to make sure that the p option is at the end as it has to appear just before the port number. So -lvnp 80 would be ok, but -lvpn 80 would not work.

Leave a comment