
TryHackMe | Nmap Basic Port Scans
In this room we focused on using three basic port scans: TCP connect, TCP SYN, and UDP port scans. They are used to identify network services running on the host. Some examples of services being provided would be NTP, DNS, or HTTP. Some of these services run on standard ports. For example, HTTP generally runs on port 80, while HTTPS will commonly run on port 443. That’s not to say this couldn’t change, as the web admin may specify a different port. You also can’t have more than one service listening on each port. As a rule, ports are either open or closed. If it is open, that means a service is listening and if it is closed, there is no service listening. However, firewalls complicate the issue. Therefore, nmap has six different states for ports:
- Open
- Closed
- Filtered: nmap can’t determine if the port is open or closed because the port is inaccessible.
- Unfiltered: nmap can’t determine if the port is open or closed, but the port is accessible.
- Open|Filtered: nmap can’t determine if the port is open or filtered.
- Closed|Filtered: nmap can’t determine if the port is closed or filtered.
To understand the difference between the different scans that nmap can perform, we need to understand the TCP header. The TCP header is defined in RFC 793 and is the first 24 bytes of a TCP segment.
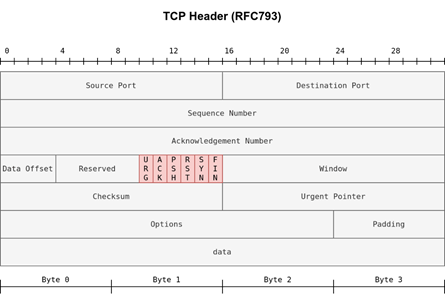
Each row is comprised of 32 bits (4 bytes). Once we understand the header, we can start to understand how the scans work. The part we are focusing on are the TCP flags, highlighted in red. TO set a flag means it’s bit is set to 1. From left to right you have the following flags:
- URG: Urgent flag indicates that the urgent pointer filed is significant. A TCP segment with the URG flag is processed immediately without having to wait on previously sent TCP segments.
- ACK: Acknowledgement flag indicates that the acknowledgement number is significant. Acknowledges receipt of a TCP segment
- PSH: Push flag asking TCP to pass the data to the application promptly.
- RST: Reset flag is used to reset the connection.
- SYN: Synchronize flag is used to initiate a TCP 3-way handshake and synchronize sequence numbers with the host.
- FIN: The sender has no more data to send
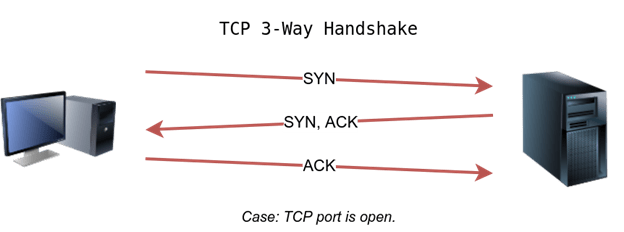
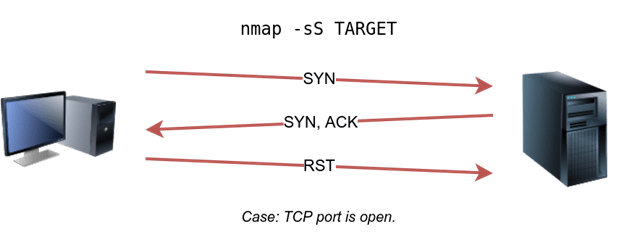
Now that we understand the flags, lets talk about how the TCP Connect scan works. In a TCP Connect scan, you will complete a 3-way handshake. The picture below shows how the TCP handshake looks.
Since we just want to know if the port is open, we would send RST/ACK immediately after confirming the port is open. The TCP Connect scan is initiated using -sT. If we use no other switches in our nmap scan, we will scan the top 1000 ports. Here is a picture of what the full scan looks like on a given port.
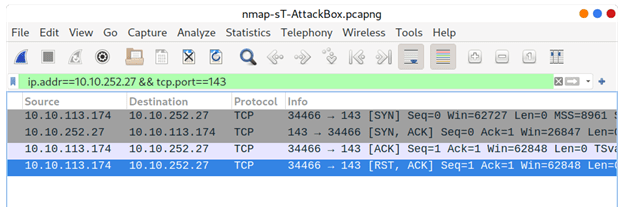
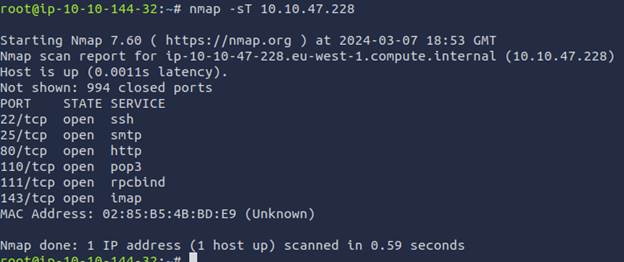
And this is what the scan will look like from the terminal. You can also use -F to only scan the top 100 ports and -r will scan them in sequential order instead of random order.
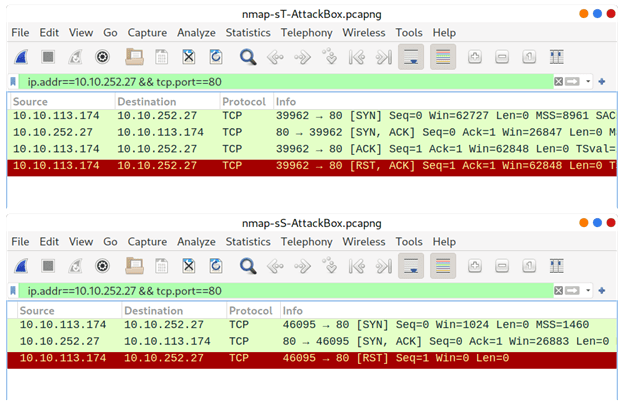
The rest of our scans will require root privileges. Best practice is to use the sudo command instead of being logged in as root. The default scan mode is the TCP SYN Scan and requires privileged access to run. The difference between the TCP Syn Scan and the TCP Connect scan is that the TCP Syn scan does not complete the 3-way hand shake. Instead, once it receives the SYN/ACK from the target, it will send an RST to the target and terminate the connection process.
This is done in an attempt to keep the scan from being logged. To select this scan you use -sS. Here is a wireshark log that shows a comparison between the TCP Connect (top) and TCP SYN scans (bottom). The SYN scan is a very reliable choice to use when conducting a scan.
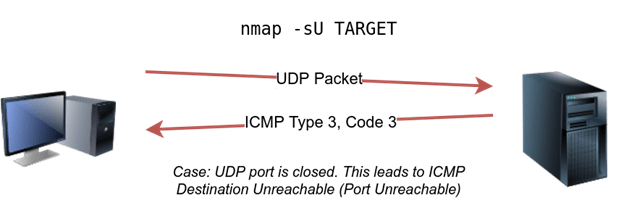
Now that we have covered the two main TCP scans, let’s cover the UDP scan. UDP is a connectionless protocol and, as a result, doesn’t require a handshake for establishing a connection. While you can’t guarantee that a service is listening on a UDP port, you can tell when a packet is sent to a closed port. We know this because a closed UDP port will return an ICMP port unreachable error (type 3, code 3). To select a UDP scan use -sU. You can also combine it with a TCP scan. Here are two pictures of what happens when a packet is sent to an open and a closed UDP port.

Finally, we discussed how to fine-tune the scope and performance of nmap. First, you can specify the list of ports scanned or a range of ports to scan using -p. If you want to scan all 65535 ports, you can specify -p-. You can also control the timing, which determines how fast packets will be sent. You can us -T<0-5> to specify the speed, here is a list of speeds:
- Paranoid – waits 5 minutes between sending each probe
- Sneaky – often used for real engagements
- Polite
- Normal – Default speed
- Aggressive – Often used in CTFs and learning environments
- Insane – Can affect accuracy due to increased likelihood of packet loss
Another option to control the pack rate is –min-rate <number> and –max-rate <number>. You can also control probing parallelization using –min-parallelism <numprobe> and –max-parallelism <numprobe>.

Leave a comment